How to Make Enamel Pins & Start Selling Online
This guide teaches aspiring pin makers how to create and sell enamel pins. It covers design, manufacturing, marketing, and business strategies
 August 5, 2024
 9 minute reading
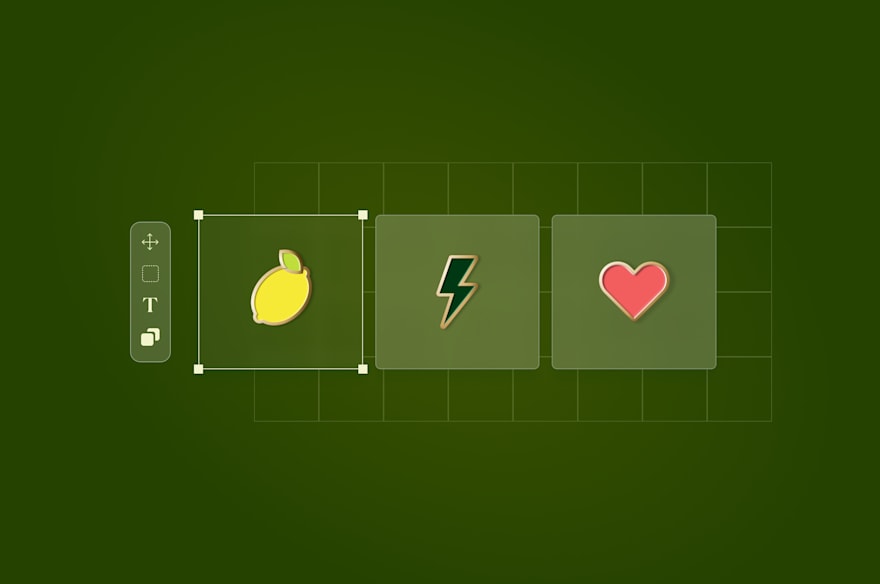
Enamel pins are enjoying a huge surge in popularity. The specialty pins market is expected to reach $150 million by 2030—up from $100 million in 2023.
Enamel pins offer creative individuals a great opportunity to start a successful business or side hustle. Whether you’re an artist, a designer, or simply someone with a great idea for a pin, learning how to create enamel pins for a business is a fun and rewarding experience. You can start creating them without a big budget, and finding a supplier is easy.
This guide will help beginners through the basic steps of creating enamel pins for the first time and show you how to transform your creativity into a viable business.
What are enamel pins?
Enamel pins are small, decorative items that can be attached to clothing, bags, hats, and other personal items. They’re especially popular among fashion enthusiasts, artists, and collectors. People use these pins to express personal style, showcase interests, or support causes.
Enamel pins are made from metal and filled with colored enamel, allowing for a wide range of intricate designs and vibrant colors.
The production process involves creating a mold of the design, filling the recessed areas with enamel, and then baking and polishing the pin to achieve a smooth, durable finish.
Enamel pins became highly popular in the 1970s and 1980s as part of the punk rock movement. They enjoyed a resurgence in the early 2000s—millennials and Gen Z alike will remember owning or seeing school backpacks absolutely plastered with creative enamel pins.
Today, enamel pins are enjoying a resurgence in popularity. In 2019, Taylor Swift wore a now-legendary denim jacket decked out with enamel pins on the cover of Entertainment Weekly.

An enamel pin is a tiny canvas for personal expression. They’re affordable, collectible, and make great gifts—which makes them a fantastic choice for starting your own business.
How to make enamel pins
Enamel pins are a great online business idea for artists, designers, and entrepreneurs. We'll walk you through every step of making and selling enamel pins, from concept to sale, so you can turn your creativity into profits.
Step 1: Brainstorm and design your pins
Before you start an enamel pin business, you’ll need to have a plan of action. Just follow these steps and you’ll be ready to go. If designing pins aligns with your creative interests, this is a perfect business idea.
Artists, designers, entrepreneurs, and hobbyists can all find value in creating these tiny pieces of art. If you have a unique idea or design and a passion for creativity, enamel pins might be perfect for you.
Conducting market research will help you refine your design ideas. Understanding the current trends and demands in the enamel pin market will show you if there’s a market for similar design ideas and if there’s already a virtually identical pin that you’d have to compete with.
Identify your target audience and take inspiration from popular designs. This research will help you create pins that resonate with your potential customers. You’ll also need to ensure your design is unique and doesn’t violate copyright law. Original designs are more likely to stand out and attract a loyal customer base.
Tools for designing pins
Decide whether you want to create the design yourself or hire a professional designer. If you have the skills or some time to learn, the following tools are widely used by pin designers:
Adobe Illustrator
Photoshop (Photopea.com for a free web-based version)
Procreate
Inkscape
Vecteezy
Sketch
Vectr
These tools let you create vector designs, which are essential to the pin-making process because they ensure that your design can be scaled to any size without losing quality. Most professional designers use these tools.
Prefer drawing by hand? No problem. You can sketch your design on paper and then digitize it using any of these tools.
If you have a great idea for a pin but aren’t confident in your design skills, hiring a professional graphic designer means you’ll get a polished and professional look. Many artists and graphic designers specialize in creating enamel pin designs, and their expertise can be invaluable.
Simplify designs for clarity and impact
Feedback from friends, fellow artists, and your target audience will help you refine your design. Take feedback seriously and in a positive spirit—being willing to adapt to demand is really important.
If you’re not satisfied with the design, don’t move on to the next step. Keep working until you’re confident. Rushing through the design phase can lead to mistakes and a less appealing final product.
💡 Remember: if you’re not 100% happy with the design, it’s unlikely your customers will be either.
The design defines the appeal and uniqueness of your pin. Eye-catching designs and loving attention to detail will help you win customers.
Remember that enamel pins are very small. Simplicity and clarity are key, and overly complex designs may not translate well to a small pin.
Once you have a solid design, it’s time to move on to preparing the artwork file for production, ensuring that your vision can be accurately brought to life in enamel form.
Use bold lines and strong colors
The pin needs to stand out and the design needs to be easily identifiable. Your customers want to showcase their personalities using their pins, so people should be able to tell what the design is at a glance.
This means using thick, bold lines and strong colors in your design. Thin lines and colors that don’t contrast enough will make it hard to identify the design—you shouldn’t have to squint to know what the enamel pin represents.
Avoid shading and fine details
Enamel pins are filled in block colors, so shading isn’t possible. Bear this in mind from the moment you start designing your pin.
Don’t: Create a design that looks great with shading and then fill it in with block colors. This will look awkward and clunky.
Do: Define the sections as block colors from the start. This will let you create an eye-catching, visually impressive pin that suits the design style.
Importance of Pantone colors
To ensure color accuracy, you’ll want to use the Pantone Matching System (PMS). Almost all manufacturers use this system, so get familiar with it.
Pantone colors are used to maintain consistency between your digital design and the final product. Manufacturers rely on these color codes to match the enamel colors closely to your original design.
Examples of effective pin designs
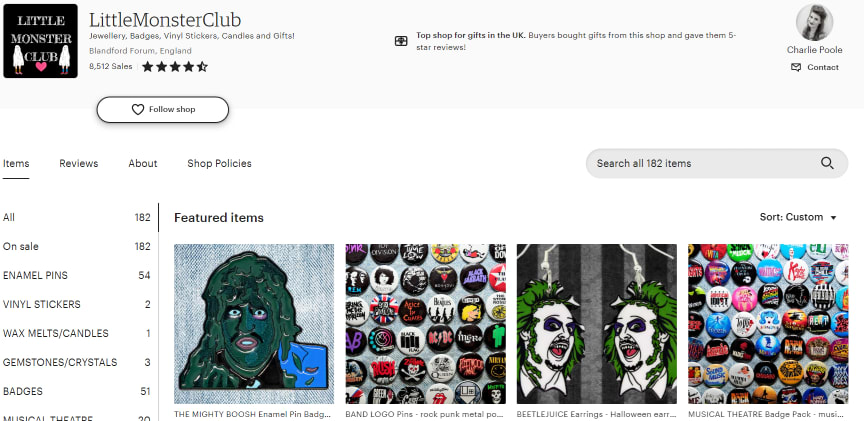
LittleMonsterClub is a great example of how to create enamel pins that resonate with a niche audience. This brand designs pins for a young UK audience, focusing on subculture categories like bands, TV shows, and other media that are popular among alternative UK teenagers.
This niche provides it with a huge list of marketable designs. Its target customer also:
Values creativity
Is looking for opportunities to express their interests and personality
Has limited resources but enough to purchase small, affordable enamel pins
Needs accessories to be small and easy to attach to personal belongings (backpacks, clothes, etc.)
These criteria make enamel pins a perfect choice for a brand targeting this market. Think about how your audience will use your designs while creating your design.
Step 2: Choose the right type of enamel pins
Choosing the right material for your enamel pin affects it’s appearance, durability, and cost. You’ll typically choose between hard enamel and soft enamel.
The right choice depends on your target audience, your design, and your supplier. Let’s cover the main differences.
Hard enamel vs. soft enamel
Hard enamel pins have a smooth, polished finish. “Hard” refers to the enamel rather than the metal used for the pin.
Hard enamel is created by filling the recessed areas of the metal mold with enamel and then baking each layer individually. The end product has a flat, durable surface that is resistant to scratches and damage—perfect for everyday accessories.
Hard enamel pins are generally more expensive due to the detailed process but you’ll get a high-quality, long-lasting product. They’re a great choice if you want a premium finish and durability.
This is a great choice for pins that will see everyday use, e.g. those attached to backpacks or jackets.
Pros:
Durable product
Scratch-resistant
Design is less likely to fade or discolor
Higher-quality
Cons:
More expensive
Soft enamel pins are made by filling the recessed areas of the mold with enamel and then baking the pin just once. The result is a textured surface where the metal lines are raised above the enamel.
Soft enamel pins are usually more affordable and allow for greater detail and texture in the design. These come recommended if you’re planning to create intricate designs or if cost is a major consideration.
These pins may be more suitable for designs that are worn occasionally, e.g. when attending niche-specific events such as conventions or concerts.
Pros:
Allows for more complex designs
Affordable
Some people prefer the feel
Cons:
Less durable
3D mold, offset epoxy, and die struck pins
Several other enamel pin production techniques are worth considering, although they may be harder to mass-produce than standard hard or soft enamel pins.
3D mold pins are metal-only designs created by pouring metal into a 3D mold. They don’t use enamel or lacquer at all. This can create high-quality, good-looking pins and also is often used for key ring accessories. Production costs can be slightly higher for metal 3D mold pins.
Offset epoxy pins are a great choice if you’re looking to have an especially detailed design made into a pin. This technique lacquers a design with layers of epoxy to protect it. The cost is higher than with enamel pins, but it means you can use shading and other intricacies—it’s a good choice if you want to market a hand-drawn design.
Die-struck pins also don’t use enamel or color. The design is stamped onto a metal pin like a custom coin or belt buckle. They look stunning, but can be somewhat expensive to produce.
Step 3: Prepare your artwork for production
Once you’ve finalized your enamel pin design, it’s time to prepare the artwork file for production. This is how your design is accurately translated into a physical pin.
Create a PDF or vector file of your design
Manufacturers will require a vector file, usually in PDF format. Adobe Illustrator is a popular tool for creating these files, but other vector-based programs like CorelDRAW can also work.
If you haven’t prepared a vector file before or you created your design by hand, you should get your design checked over by a professional who has experience in vector designs. Hiring a graphic designer for a quality check doesn’t cost much but ensures your design will translate properly into a finished product.
Some manufacturers offer services to convert your design into a vector format, but this will come at an additional cost.
Timing is important here. Ensure that your design is complete and all revisions are done before submitting the artwork file. Once the file is sent to the manufacturer, making changes may cost extra.
Ensure colors are enclosed by lines
All colors should be enclosed by bold lines. This prevents colors from bleeding into each other during production. Your manufacturer may reject your design if colors aren’t enclosed by lines, or even worse, you could receive defective products.
If you created your design digitally, make sure it meets the manufacturer’s specifications for line thickness, color separations, and file formats. Check with your chosen manufacturer for their specific requirements to avoid any delays or additional costs.
Mock-ups and spec sheets for manufacturers
Consider creating a mock-up design for the manufacturer to show them what you’d like the pin to look like. You don’t need to use enamel for this (and it doesn’t need to be made of metal). Using card and felt is an easy way to create an accurate mock-up at a low cost.
You could also provide a spec sheet for your manufacturer outlining your expectations for the product. This gives you a useful reference point if the prototype doesn’t come back as you expect.
Once your artwork file is ready, submit it to your manufacturer, making sure it fits their submission guidelines.
This usually involves sending the file via email or through an online portal. Double-check every detail for accuracy before submission. Properly preparing your artwork file sets the stage for a smooth production process, bringing your enamel pin design one step closer to reality.
Step 4: Find and work with manufacturers
Finding the right manufacturer for your enamel pins may require some trial and error, but it’s worth taking time over this decision. The quality, cost, and turnaround time of your pins largely depend on the manufacturer you choose—here’s how to find the right enamel pin manufacturer.
Research and select manufacturers
Start by researching potential manufacturers online. Platforms like Alibaba, Etsy, and specialized forums can provide a list of manufacturers and are generally reliable.
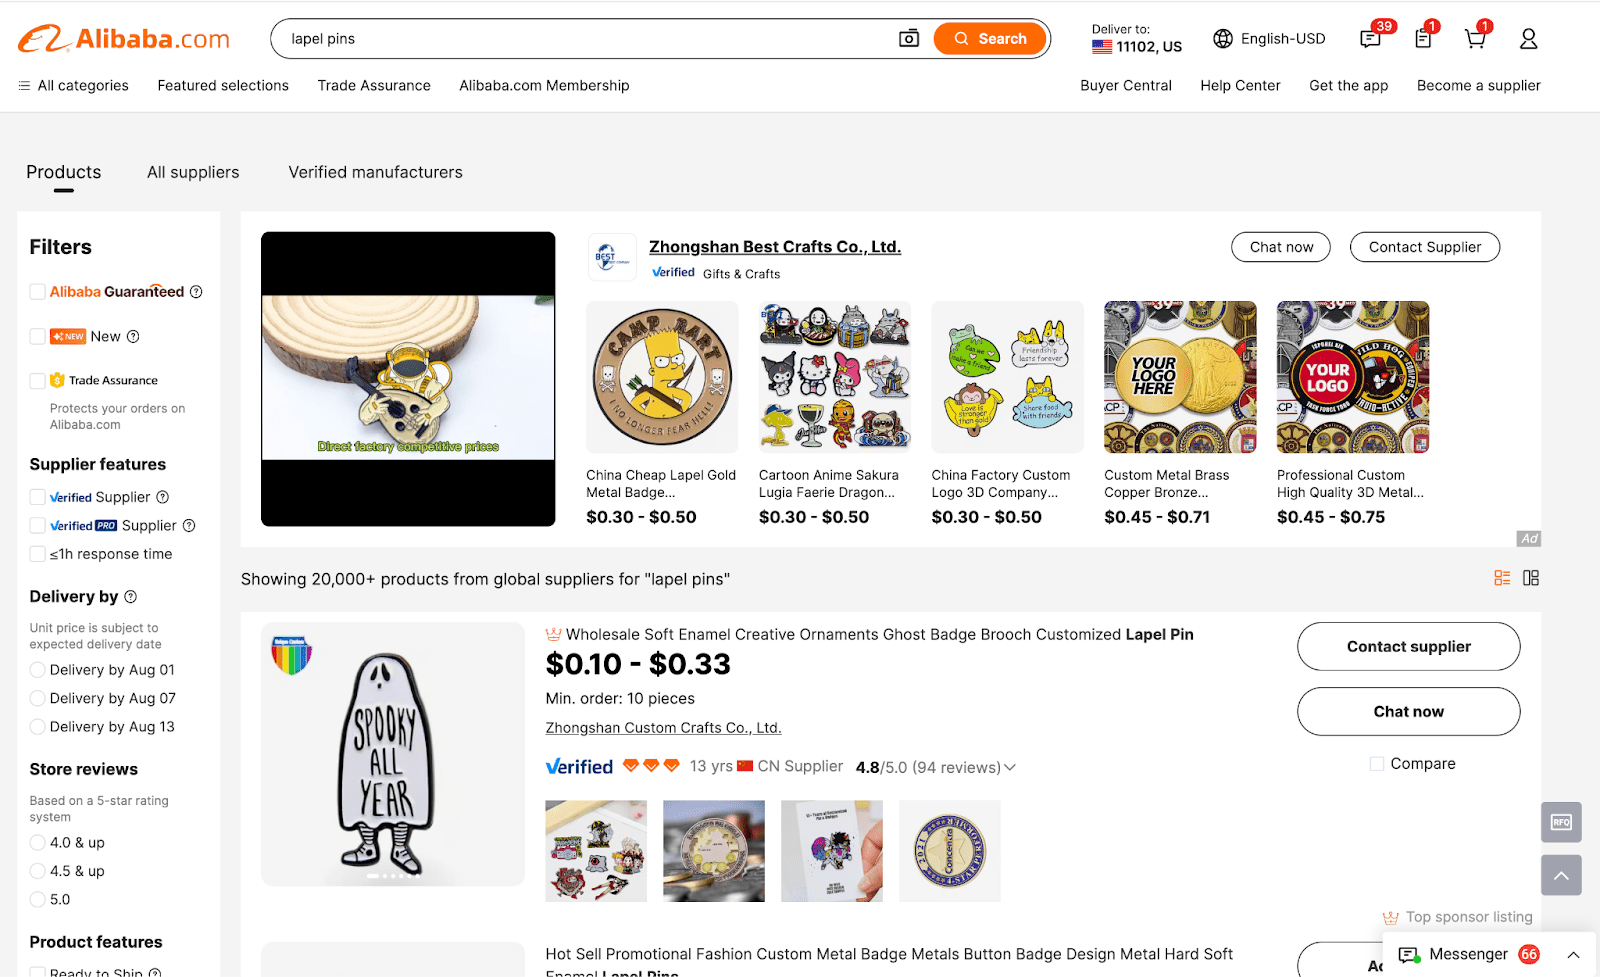
Narrow your search down to manufacturers with positive reviews from customers with a similar need to yours and a portfolio that showcases their work. If they don’t have examples, why not?
Referrals from other pin makers or creative communities can also be invaluable in finding a reliable manufacturer. This helps you to spot common problems people in a similar situation have had with this producer.
Communicate with manufacturers
Provide any potential manufacturing partner with detailed information about your design and requirements, including:
The artwork file
Your chosen materials
The pin size
Order quantity
The pin-back type
Clear communication helps ensure that the manufacturer understands your vision and can provide an accurate quote.
Order samples and proofs
Always ask about the cost per unit, turnaround time, and their policies on revisions and quality control. Ask for a sample of your pin before committing to a full order. This allows you to check the quality and make any necessary adjustments before mass production.
Set payment terms
Ideally, you should be able to pay 50% upfront and the remaining 50% upon approval of the final product. Steer clear of manufacturers who ask for payments of 100% upfront—these aren’t always scams, but there’s a much higher chance you won’t see your money or a product again.
The split payment system helps mitigate the risk and ensures that you have some leverage if the final product does not meet your expectations.
Find a global supplier
As many as 95% of enamel pin manufacturers are based in China, with most others located in the Middle East. Some manufacturers advertise themselves as being based in Europe or North America, but many of these subcontract production to pin manufacturers in China, so you’ll end up paying extra for the same product.
Working with producers in China offers cost advantages, although it also presents potential challenges like longer shipping times and communication barriers.
If you receive quotes from multiple manufacturers, compare them not just on price but also on quality and reliability. Cheap doesn’t mean best if it compromises the quality of your pins. Aim to find a balance between cost and quality to ensure that your pins meet your standards.
Keep communication regular, friendly, and professional. This gives you the best chance of enjoying a great working relationship.
Step 5: Choose materials and finishes
The choice of material affects the overall quality and perception of your pin.
Discuss your design with your manufacturer. They’ll be able to offer valuable insights into which material will best suit your specific needs and design.
Metal types (gold, silver, copper, etc.)
Choosing an appropriate metal for your pin will impact its cost, durability, and design. Most pins are made using zinc or iron alloys, as stainless steel is more expensive to work with.
Your manufacturer may only offer a few choices of metal. Here are some of the most popular materials:
Zinc. Zinc is durable, relatively inexpensive, and retains its color. It’s also softer than stainless steel, making it easier to work with.
Iron alloy. Some iron alloys are cheaper to produce than steel, although they may not be as resistant to rust.
Steel. Stainless steel is very hard, durable, and rust-resistant, making it a great choice for pins. However, it’s expensive to produce and work with.
Silver. Coating a pin with silver produces a stunning finish. Sterling silver is less commonly used, as it bends easily and is expensive to produce.
Copper. Copper is hard, durable, and attractive, although it will discolor over time.
Gold. Gold plating is sometimes used for luxury pins, although plating will wear off over time. Solid gold is almost never used, as it’s very soft and extremely expensive.
Check your manufacturer’s options and work out which will offer you the best margins while guaranteeing a high-quality product.
Backing options
Choosing the right pin-back for your enamel pins is essential for both functionality and user satisfaction. The pin-back secures the pin to clothing or other items.
The most common types of pin-backs are:
Butterfly clutch
Rubber clutch
Locking pin-back
The butterfly clutch clips securely onto the pin post and is relatively easy to attach and remove. It’s ideal for most standard uses and provides a secure hold for pins worn on jackets, bags, and hats.
Rubber clutches are made from flexible rubber and offer a snug fit. This prevents the pin from slipping.
Rubber clutches are typically chosen for their ease of use and comfort. They lie flatter against the fabric and are less likely to irritate the skin. They’re especially good for pins worn on thinner fabrics or in places where a lower profile is desired.
Locking pin-backs lock onto the pin post and require a small key or tool to remove. They’re perfect for valuable or sentimental pins that you don’t want to lose.
While they’re more expensive and slightly more cumbersome to use, they provide peace of mind for those worried about losing their pins.
Special features
You may want your pin to include special features, although this will limit the range of available manufacturers. Some special features of pins include:
Magnetic attachments
Buttons that produce sounds when pressed
Changing colors
Moving parts
Think about the value any special feature adds to the pin. It’ll likely increase your costs substantially, so if you can’t sell it at a correspondingly higher price, it may not be worth it.
Step 6: Manage inventory and costs
Now that you know how to create enamel pins, it’s time to think about managing your inventory and costs.
In the early days of your business, you should be flexible with ordering and cost management. You’ll need to learn from experience and work out an optimal strategy based on demand, but you also need a Day 1 plan.
Here’s how to make one.
Decide on order quantities
Deciding on the quantity of enamel pins to produce impacts your budget, inventory management, and overall project success.
Start by considering your goals and the demand for your design. Are you creating these pins for a limited edition release, a special event, or as part of a broader merchandise strategy? Your goals will help guide your decision on how many pins to order.
Most manufacturers have a minimum order requirement—typically around 100 units.
Starting with the minimum order is often a good strategy, especially if this is your first time producing enamel pins or if you are testing a new design. This allows you to gauge interest and demand without committing to a large upfront investment.
Questions you should be asking include:
Where will I store my inventory?
Can I afford to order in bulk, reducing overall costs?
Will I need to spend money on storage space (this can be as simple as purchasing plastic boxes—it’s still an expense).
Where will I sell my pins, and will I need a large stock available on demand?
It’s also important to factor in potential reorders. If your pins prove popular, you’ll want to reorder quickly to avoid running out of stock. A good relationship with your manufacturer makes it easier to secure timely reorders and consistent quality.
Determine cost factors (size, complexity, number of colors)
The larger and more complex your pin’s design is, the more expensive it will be to produce. However, you don’t want to compromise design quality to save money, or nobody will buy the pin.
Here’s how to evaluate your costs.
Size
The size of your pin will influence the level of detail that can be included, the overall cost, and how it will be worn or displayed.
Common sizes for enamel pins range from 0.75 inches to 2 inches.
Smaller pins are typically between 0.75 and 1.25 inches. They’re easier to fit on various surfaces, such as lapels, hats, and bags, and are usually less expensive to produce due to the smaller amount of material required.
Larger pins range from 1.25 inches to 2 inches. They allow for more detailed and intricate designs—after all, with a larger canvas, you can include more complex elements and finer details.
However, larger pins are generally more expensive to produce and may be less versatile in terms of where they can be worn. They are more likely to be used as statement pieces or collectibles rather than everyday accessories.
Complexity
A design is made more complex by the following factors:
Number of sections
Using curved lines
Number of very small sections (e.g., colored eyes with irises & pupils)
Use of uncommon design fonts
The design being hand-drawn versus digital
Unusual colors
Sections or edges tapering to sharp points
The greater the design’s complexity, the more expensive the pin is likely to be. Also, more complex designs present more opportunities for something to go wrong during production—keeping it simple wherever possible is the best policy.
Number of colors
Manufacturers will typically have a limit for the number of colors used in a design, usually around five. Going over this limit will cost extra.
You may also find that some colors are more expensive to produce than others. Black and white are often the cheapest colors—ask suppliers upfront if there’ll be any additional charge for your choice of colors.
Run a quality check
The final quality check ensures that your pins meet your design specifications and quality standards before they are distributed to customers. Here’s how to conduct an effective final quality check:
Determine who will be responsible for inspecting the pins
You may wish to do this yourself, but an extra pair of eyes never hurts—you could ask a keen-eyed friend to help. The goal is to catch any defects or inconsistencies before the pins reach your customers.
Define the inspection criteria
During the inspection, look for common defects such as:
Color inconsistencies. Ensure that the enamel colors match your design specifications, typically using the Pantone Matching System.
Surface flaws. Check for scratches, bubbles, or other imperfections on the enamel or metal surfaces.
Attachment issues. Make sure the pin-backs are securely attached and function properly.
Detail accuracy. Verify that all design details are accurately reproduced, including lines, text, and shapes.
Use tools to assist the inspection
You should work in a well-lit environment so you can see the details clearly. Using magnification tools can help spot smaller defects that might be missed by the naked eye.
Take your time with this process; a thorough inspection can prevent customer dissatisfaction and returns.
Be prepared to inspect shipments immediately
Your quality check should begin as soon as possible after you receive the shipment from the manufacturer so that issues can be raised immediately.
If defects are found, document them with photos and detailed descriptions, and communicate these findings to the manufacturer. Most reputable manufacturers will work with you to correct the issues, whether through re-production or partial refunds.
Designate an inspection area
Decide where to perform the inspection. Ideally, it should be done in a clean, organized space where you can easily sort and handle the pins.
High-quality pins reflect positively on your brand and encourage customer retention. Having proper quality control measures in place is absolutely essential.
Manage production timelines
Your supplier will provide you with an estimate for how long it will take to produce and ship an order—this will usually be two to four weeks if they’re based in China.
Use this timeline to determine how much inventory you’ll need to hold to fulfill orders as they come in. This will help you give accurate shipping estimates to your customers.
When you first start an enamel pin business, you’ll probably need to set a couple of hours aside every two to three days to ship orders. This may increase to shipping daily if your business is successful—the important thing is to keep production and shipping consistent.
Step 7: Market and sell your enamel pins
Marketing your business online is essential for getting seen by customers. You’ll need to allocate an initial marketing budget—this doesn’t need to be too much, but it should be enough to test a few marketing channels and find a good sales platform.
Find your niche and target audience
Where do your customers go to buy pins? If you’re marketing to younger people, you may find that platforms like Etsy are the best place to sell.
If you’re marketing toward a highly niche demographic, you’ll learn that setting up your own online store adds credibility to your business. Before you start designing and marketing your pins, consider who will buy them and how they’re likely to search for your products.
Set up an online store
Starting an online store may have higher initial costs and require more effort than using a platform like Amazon or Etsy, but it comes with significant benefits.
You can easily set up an online store using platforms like:
Wix
WooCommerce
Square
Having your own storefront gives you the opportunity to fully customize your branding and also unlocks content marketing opportunities.
However, if you’re addressing a widely searched niche and don’t want to invest a lot of time and effort into web design, Etsy, eBay, and Amazon can all be attractive options.
Run marketing strategies
Here’s an overview of the most effective online marketing strategies for enamel pin businesses.
Social media marketing
Social marketing is non-negotiable for a successful enamel pin business. Consider which platforms your audience is likely to use—younger customers are more likely to use TikTok and Instagram, and Tumblr is a great choice for niche or alternative designs.
Pinterest and Facebook are excellent platforms if you’re marketing to a wider audience. Remember to tag your designs appropriately on each platform to help your audience find you.
Pay-per-click (PPC) ads
These can be customized with your target keyword, e.g. “Bridgerton enamel pins” to make your site the first thing people see when they Google a query.
A key advantage of this strategy is that people searching the term are already very likely to make a buying decision. You don’t have to put a huge amount of thought into your keywords and you’ll only pay if somebody clicks on your ad.
Content marketing
Content marketing is a longer-term and more labor-intensive strategy, but is a great move if you’re starting your own website.
Creating blog content around your niche (e.g. “Taylor Swift accessories,” “Taylor Swift badge,” “Taylor Swift enamel pins”) gives you an opportunity to attract organic visitors to your website and build long-term sales.
You need to start your own website to make full use of this strategy, and it’ll take a bit of work. However, if you enjoy talking about your passion project, it can be very rewarding.
Packaging and shipping
When shipping your pins, you’ll need to consider:
Does the item need protecting (e.g., using bubble wrap)?
Should bulk-ordered items be enclosed in individual plastic bags or paper wrap inside the parcel?
Do you want bespoke or branded packaging?
Should you include anything else in the packaging for marketing purposes, such as a thank you card?
Reliable, high-quality delivery is an opportunity to market your brand as a high-quality purveyor. It will increase your costs, but these may be offset by improved brand loyalty and reputation.
Manage pricing and inventory
Research your competitors to understand how much you can sell a product for. Good pricing strategies for enamel pins include:
Selling for slightly more than a high-volume competitor but advertising key improvements in quality
Selling for 1¢ less than a major competitor—this makes your product more attractive without seriously affecting your margins
Offering free shipping on bulk orders
You’ll also need to keep track of your inventory. The fastenings on your pins are delicate and can easily become tangled, so avoid storing large quantities of pins together.
An advantage of creating an enamel pin business is that you likely won’t need to rent extra storage space. However, you should still keep track of inventory costs such as storage boxes.
Knowing how to create enamel pins is only half the battle. Proper inventory management and consistent, targeted marketing is the best way to establish yourself as a reliable retailer and get your products sold.
Tips on how to create enamel pins for a business
Creating enamel pins can be rewarding and profitable—but you need to be prepared for setbacks. Here are some quick tips to help you navigate the process successfully.
Research your market
Thorough market research is the best way to identify a design that will sell. Take time to understand current trends, popular designs, and your target audience.
Look at what is already selling well and think about how your unique designs can stand out. It’s all about making an immediate visual impact—for both you and your customers.
Keep it simple
Enamel pins are small, so keeping your designs simple and bold is crucial. You should:
Avoid intricate details that may not translate well onto a small surface
Use strong lines and solid colors to ensure your design is clear and visually appealing
Use simple designs—these are easier to produce and tend to be more striking and recognizable
Use Pantone colors
When preparing your artwork file, use Pantone colors to ensure color accuracy during production. Pantone colors are standardized, which helps maintain consistency between your digital design and the final product.
Start small
When you’re starting your business, begin with a small batch. This means you can get an idea of what people want without spending too much upfront.
It also makes it easier to work out production issues without large orders being affected.
Build solid relationships
Great working relationships take time, but it’s worth putting that time and effort into establishing good terms with your supplier.
A reliable, approachable manufacturer is worth its weight in gold. You’ll enjoy a smoother production process, better-quality pins, and improved troubleshooting if you run into problems.
Use multiple manufacturers
Working with multiple manufacturers means you won’t be as reliant on a single source. This can save you from major issues if one manufacturer faces delays or quality control problems.
You may also find that different manufacturers specialize in different types of pins and special features—if you want to expand your range of products, consider working with more producers.
Use social media to promote your products
Social platforms like Instagram, Pinterest, and TikTok are vital for showcasing your designs and connecting with potential customers.
High-quality photos and engaging content will get your products noticed. Successful engagement can solidify your brand’s reputation. Working with influencers is an effective strategy, or you could participate in pin swaps to draw more eyes to your product.
Consider custom packaging
Thoughtful packaging can enhance the appeal of your enamel pins. Consider designing custom packing cards that complement your pin designs and brand aesthetic.
Good packaging protects your pins during shipping and adds a professional touch that customers will appreciate—it’s a great branding strategy.
Get help creating enamel pins
Managing the entire enamel pin creation process on your own can be overwhelming when you’re first starting up. You’ll also find that as your business grows, outsourcing tasks to professionals helps you deliver a better product.
That’s where hiring help on Fiverr can save you time, money, and effort. The community brings skilled individuals together to solve problems—you don’t need an in-house design team when you have Fiverr.
If you need design input, you’ll find talented graphic designers and vector design experts ready to give tips and feedback or even transform your ideas into finished products.
Concerned about whether you’re sending the artwork file in the proper format? Find someone who has done this before and can ensure your relationship with your manufacturer starts on a positive note.
Whether you need a second pair of eyes for quality control or a branded packaging expert to help you offer your customers something unique, you’ll always find the help you need.
This community of freelancers is ready to help you streamline your production process and focus on the aspects of your project that you enjoy the most. Hiring help on Fiverr is an easy way to bring in the expertise you need to make your enamel pin business a success.
Make and sell enamel pins FAQ
How much does it cost to make enamel pins?
As a ballpark figure, the cost of making enamel pins is between $130 and $220 per 100 units. Hard enamel pins tend to be slightly more expensive to produce than soft pins.
Can I make enamel pins at home?
Making enamel pins at home just isn’t feasible. Production requires specialized equipment and processes, including metal molds and enamel baking. You’ll need to work with a manufacturer who has the necessary tools and expertise to produce high-quality pins.
What are the best sizes for enamel pins?
The standard sizes for enamel pins range from 1 to 1.5 inches. This allows for sufficient detail while remaining practical for use on clothing, bags, and other accessories. The best size for your pin will depend on your design and intended use—think about how the buyer will want to display their pin.
How do I choose colors for my pin design?
Use Pantone colors to ensure accuracy in production. The Pantone Matching System is a standardized color reproduction system that helps maintain consistency between your digital design and the final product. Most manufacturers rely on Pantone codes to match enamel colors closely to your design.
What are the differences between hard enamel and soft enamel pins?
Hard enamel pins have a smooth, polished finish. They are durable and have a high-quality feel but are more expensive. Soft enamel pins have a textured surface, where the metal lines are raised above the enamel. They allow for more detail and are generally more affordable, but are less durable than hard enamel pins.
How do I find a reliable manufacturer for my enamel pins?
You can find manufacturers online through platforms like Alibaba, Etsy, and specialized forums. Contact manufacturers with positive reviews and a strong portfolio, and ask for referrals from other pin makers and creative communities.
Related Guides


Yury Byalik has a diverse background in strategic advisory services within the realms of digital marketing, finance, and mergers and acquisitions. With over 15 years of experience, Yury has established himself as a trusted voice in these industries, providing insightful analysis and actionable advice to his audiences.
